|  | AMBITION |  | |
|---|---|---|---|---|
 | |
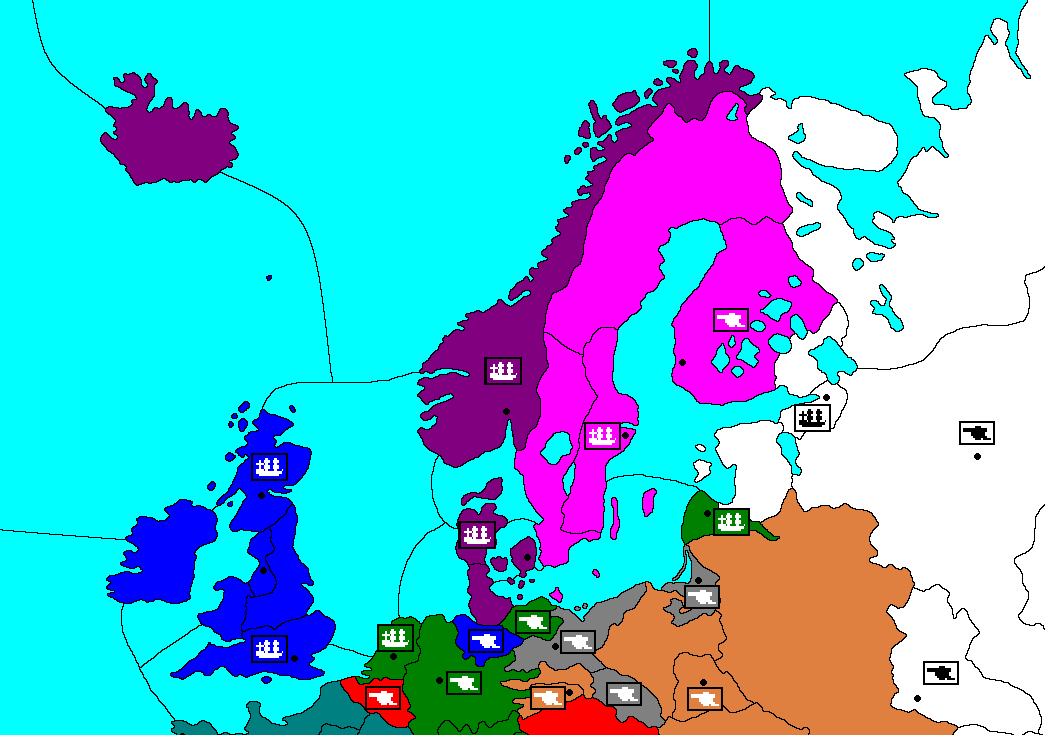
IntroductionAmbition & Empire is a great variant designed by Jeff Kase and Baron Powell. It is a Diplomacy variant for ten players set in Europe at the conclusion of the Seven Years War (1756-63). The title pays tribute to the empire-building, war-and-conquest philosophy held by the great leaders of the day; a remarkable cast of historical figures that included Frederick the Great of Prussia, Maria Theresa of Austria, and Catherine the Great of Russia. |
|
One issue that sometimes, sadly, makes players wary of trying this variant is the disparity in starting size of the great powers. Some, like Denmark-Norway and Poland & Saxony, begin the game with only two units and two supply centers. Others, like Austria and Britain & Hanover, start off with four units and four supply centers, although this strength is mitigated by the "detachment" of one of their supply centers (Austrian Netherlands for Austria; Hanover for Britain & Hanover). Players should not be discouraged by this initial inequality. A few rules in this variant — the arming of the neutral supply centers, the implementation of a rule for the spending of "diplomacy points" (a.k.a. DPs), and a mechanism to allow smaller powers to gain a third home supply center for a build site — help to level the playing field. We will discuss these three features below, and you can see the official variant rules in another article in this issue, or download them as a PDF file from here. Jeff and Baron have also written a brief explanation of how they developed the variant. First, in addition to the ten playable powers, each neutral supply center is a "minor power": a non-player, armed, neutral supply center representing one of the smaller states of Europe and North Africa. Each minor power, although a "non-player," starts with a unit (usually an army). Minor power units prevent the great powers from simply moving into an empty space and gaining control of the SC, because a great power will need support to capture the supply center. These minor power units cannot move, but can provide offensive or defensive support if the unit has been ordered to do so by a great power using "diplomacy points." There are some exceptions (known broadly as "the Religious Rules") that are discussed in the rules (for example, the Papal States can only support the actions of another Catholic unit). At the start of the Spring and Fall turns, each of the playable great powers receives one "diplomacy point" for each SC it controls, up to a maximum of three "diplomacy points" per turn. During each Spring and Fall turn, each great power may allocate none, some, or all of its DPs to minor powers that still have units on the map. For each "diplomacy point" allocated, the allocating great power submits an order for that particular minor power's unit. In the event of a conflict, an order for a particular minor power's unit is followed if it is supported by more "diplomacy points" than any conflicting order. If there is a tie, then the unit holds. "Diplomacy point" allocation is not published in the adjudication; only the end results are published, such that only the GM knows how Great Powers have allocated their "diplomacy points." This gives players plausible deniability if they promise but do not provide DPs to a so-called ally, and also enables them to silently thwart a rival's attack even in a distant area of the board. Intelligent Ambition & Empire players closely study the actions of the neutral units for potential clues to their opponents' true intentions. Third, the great powers that begin with two supply centers (Denmark-Norway, Poland & Saxony, Spain, Sweden, and Turkey) may acquire a third home SC during the game. This center is the first supply center that the great power captures, and is fixed for the remainder of the game Those of us who have enjoyed the extensive play-testing of this variant would like to go into some specific details on how these smaller two supply center powers can be played in the crucial first years. This is the first in a series of articles that we hope will inspire discussion of and additional participation in the variant. Strategic OverviewIn an initial look at Denmark-Norway, the position is admittedly challenging. Denmark-Norway does not have a corner position, it starts with only two supply centers, and there are few minors that are readily available for expansion.� Given this tough start, it is necessary to expand quickly, or die trying.� One of the most viable strategies is to attack either Britain & Hanover or Sweden immediately.� A key component of either plan is that Denmark-Norway wants to get Britain & Hanover and France fighting as soon as possible, and likewise set Russia and Sweden into hostilities early on. If either Britain & Hanover or Sweden is left a free hand, they will cause trouble for the purple units. Let's look a little more in depth at these main strategic options. Under the first, western oriented strategy, Britain & Hanover is the target. In this case, France and Prussia are the primary allies that Denmark-Norway needs.� One obvious target in this western oriented strategy is Hanover, which can be destroyed in S'1763 in a well-coordinated attack with Prussia. Looking towards the naval battle in the seas around Albion, an immediate attack on Britain & Hanover will be a tough sell for even the most aggressive French player. To entice the French, Danish-Norwegian players should consider prioritizing the support of the minor power fleet in United Provinces for the French foray into the Channel, in order to accomplish the primary goal of creating French-British conflict. If this avenue is not promising, even a more cautious French player often can be convinced to silently provide DP support for the Danish-Norwegian move of F Christiania to the North Sea. Danish players must also neutralize the potential spoilers, Spain and Sweden. It is critical to get El Rey on board, as Spanish units can either cause major problems in the French rearguard, or provide valuable assistance against the British fleet that starts in Gibraltar. A Swedish stab of Denmark-Norway would be devastating; so to keep the Swede busy, the Dane needs to stir up Swedish-Russian conflict, promising (and maybe delivering) "diplomacy points" (DPs) as needed to instigate the Battle of Bothnia. Under the second, eastern-oriented strategy, Sweden is the target. The plan is very obvious: recruit Russia, befriend Britain, and suffocate Sweden.� If executed correctly, Sweden will likely only be able to stop one of the four Danish-Norwegian and Russian orders in S'1763, and either Abo or (if Denmark-Norway is lucky) Stockholm will be taken in F'1763. If it has the element of surprise, a solo attack on Sweden can also be successful, although it is far riskier, because a failed attack leads to near-certain stalemate resulting in the stagnation and death of both Denmark-Norway and Sweden. It is much easier to attack Sweden if Britain & Hanover is distracted to the south. It is difficult to convince Britain & Hanover not to move into the North Sea, because Edinburgh has such limited options; but�a request for a demilitarized zone is more likely to be accepted by a Whitehall facing a potential multi-front war. It is counter-intuitive to help one's greatest threat, but it may be worthwhile to promise DP support for a British attack on France. It could take two or more years to gain Stockholm from a Swedish war; so that breathing room could well be worth the price. With the build and third home supply center gained from Stockholm, Denmark-Norway will have the strength to turn effectively towards Britain & Hanover, Russia, or other targets. So what happens when the diplomatic situation in S'1763 is not shaping up as desired? Attacking Britain & Hanover or Sweden may not be a viable option, due to other powers proving unwilling to launch an immediate attack.�The problem is that Denmark-Norway cannot gain a supply center easily without stepping on somebody's toes.� One alternative is to aim for the supply centers along the Baltic Sea coast: Courland, Konigsberg, Berlin, and Mecklenburg.�The problem is that none of these centers are sustainable positions, because they are actually closer to other powers than to Danish-Norwegian reinforcement. The final possibility is moving to Helgoland Bight, and hoping to get the United Provinces or Hessen-Westphalia.� This is effectively a delayed attack on Britain & Hanover, as it will put Denmark-Norway in position to challenge for the North Sea the following year, when willing allies may be more readily available. The ultimate goal of any Diplomacy player is a solo victory, so let's look at what Denmark-Norway needs to do in order to capture the magic number of 15 supply centers. One method of making such a calculation is by using the Caissic analysis from Paul Windsor's article Geography is Destiny. This piece discusses the tempi (moves) needed to most efficiently reach victory conditions. On the Ambition & Empire map, Denmark-Norway (using only the base two home supply centers) needs to expend a total of twenty-seven tempi to most efficiently reach fifteen supply centers for a victory. There are no centers contiguous with either Copenhagen or Christiana, though there are twelve centers within a two tempi radius. That means the Dane must capture only one supply center that is three tempi distant to achieve a solo. In other words, Denmark-Norway can win without ever leaving the North Sea and the Scandinavian waters, if they can scoop up Moscow or Liverpool as their 15th SC. This analysis emphasizes both the great potential and the vulnerability of Denmark-Norway, as it is surrounded by a wealth of supply centers. The Caissic calculations become complicated very quickly once one takes into account the third home SC rule. Danish players need to take this rule into account in their opening strategy, because the first captured supply center will be a home SC forever (at least, as long as it remains in Danish hands). Based on the Caissic analysis, the capture of a British or Swedish SC is not the most efficient route to victory, because these SCs do little to shorten the number of tempi required to win. By the same token, a North German 3rd third home SC is very valuable, because the dense grouping of Germanic supply centers are brought within Danish reach. Of course, one should not dash headlong for Hessen-Westphalia based on statistical analysis alone, and must make other considerations. Ideally, a home SC should be removed from the others on the board, both for defensive purposes and so that it can be left empty in the fall for a build. By this standard, Stockholm, Abo, and London are desirable, with Edinburgh, United Provinces, Konigsberg, and Courland all representing reasonable backups. Looking at Denmark-Norway's performance so far in the Ambition & Empire variant, it has been the worst of all ten great powers, with no solo victories, 1 draw, 6 survivals, and 9 eliminations. On the positive side, Denmark-Norway has reached a double digit SC tally 3 times, which is in the middle of the pack, and was the largest power in one game (12 SCs, the lone Danish draw). While Denmark-Norway and Sweden can potentially form a strong alliance, the game history indicates that they have more of an "either/or" relationship, with one succeeding at the expense of the other. Out of 16 games, only once did both players succeed, while the Dane did well 5 times, the Swede 7 times, and both were eliminated early 4 times. In 9 of 12 games for which we have opening moves data available, hostile action was taken by at least one of the parties against the other in S'1763. It appears to be a classic "Prisoner's Dilemma", where cooperation would benefit both parties, an unexpected stab by one party leads to greatest individual benefit, and mutual stabs leads to mutual destruction (true in 3 of 4 games). One could conclude that "The Kalmar Union" (Scandinavian alliance) has not been given enough of a chance, but a Danish player could also conclude that he doesn't want to be the Scandinavian sucker. Tactical Overview |
|
Now let's take a look at the tactical options to start the game. To begin with, there are only two serious options for one of the initial Danish-Norwegian units, Fleet Christiania: the North Sea, or Scania. While moves to Skagerrak, the Norwegian Sea, the Barents Sea, and Novgorod are possible, these options are not worth real consideration, because such orders neither defend Denmark-Norway against first year stabs by neighboring powers, nor put Denmark-Norway in a position to gain a crucial third supply center. In contrast, there are many more options available for the other starting Danish-Norwegian unit, Fleet Copenhagen. Starting in the southwest and working around clockwise, that fleet has viable openings to Holstein (west coast), to Helgoland Bight, to Scania, to the Baltic Sea, and to Holstein (east coast). When those options are combined for both starting units, the result is the following matrix of possible openings:
Now, let us take some time to look at each opening in some depth, one by one. Because of the limited number of games of the Ambition & Empire variant that have been started thus far (seventeen overall, five using the current map and rules), much of this discussion is more theoretical than based upon play history. Where there are statistics from openings used in actual games, they are provided. Western OpeningsThe basic division we used to organize Danish-Norwegian opening theory in Ambition & Empire is to divide the openings into two groups, using the order for F Christiania as a bellwether. Openings that use F Christiania to North Sea show a definite orientation of antagonism towards Britain & Hanover by the Danes. Because the North Sea borders two British supply centers, Prime Ministers tend to see this move as a declaration of war, and defend the North Sea fiercely. In four of five games using the current map and rules, the British have used either F London or F Edinburgh to support the other into North Sea. Thus, the best result that Denmark-Norway can typically achieve in S'1763 is to bounce in North Sea, using diplomacy points to order F United Provinces to support F Christiania to North Sea. Danish players embarking on this path need to realize that success against Britain will require great patience, as well as a steadfast ally in Stockholm. 1F Christiania to North Sea, F Copenhagen to Holstein (west coast) From an offensive perspective, this is the strongest opening for attacking Britain immediately, especially if Prussia is willing to strike in S'1763. Prussia should be able to dislodge the British army in Hanover, which will then be forced to disband when Holstein is not available for retreat. F Holstein/wc likely will not be able to gain a supply center (without stabbing Prussia immediately in F'1763, or an arrangement where a Prussian advance allows Denmark-Norway to slide into Hanover behind them), but allowing the British army into Holstein is not a good idea, and F Holstein/wc will be able to move into Helgoland Bight next. This opening has the advantage of putting pressure on Britain & Hanover in multiple areas, which will spread their DPs thin. This opening is even more effective when combined with a French move into the English Channel or Mid-Atlantic Ocean. From a defensive perspective, if the Danish-Norwegian player fears a British offensive, then this is a set of orders which can keep John Bull at bay for a season and even bring the battle to his doorstep. The massive downside of this opening is that it leaves the Danes extremely vulnerable to a Swedish stab, with Christiania almost certain to fall in F'1763. 2F Christiania to North Sea, F Copenhagen to Helgoland Bight
This set of orders is named after Canute the Great (1016-1035), who established a Danish empire along the North Sea coastlines. It is similar to Opening 1, in that it also shows a prioritization for British concerns to start the game. The move of F Copenhagen to Helgoland Bight could either support a further attack on the North Sea in the fall, or put direct pressure on a variety of minor powers for a fall attack. This opening is logical when Prussia is not interested in a spring attack on Hanover, or (Yahtzee!) is willing to delay that attack until the fall, leaving no need to worry about the retreat of A Hanover to Holstein. Even more than Opening 1, this opening is enhanced by the movement of French F Brest to the English Channel, as this combination results in the maximum possible pressure on Britain's naval defenses. Another advantage of Opening 2 over Opening 1 is that F Helgoland Bight has greater flexibility for "Plan B" in the United Provinces � Hessen-Westphalia - Hanover area, plus the move to Helgoland Bight is guaranteed to succeed. Defensively, this opening suffers from the same extreme vulnerability to a Swedish stab as Opening 1. This opening has been used once in the five games played under the current map and rules, in which Denmark-Norway successfully captured the United Provinces for a first year build. 3F Christiania to North Sea, F Copenhagen to Scania
Opening 3 is either extremely defensive or offensive, depending on the circumstances. At first, we called the defensive scenario "The Danish Hedgehog", but "hedgehog" seemed like an overly strong term for Denmark-Norway's vulnerable defensive position, and so "guinea pig" — basically a hedgehog without spikes — seemed more appropriate. When faced with an attack on both the British and Swedish fronts, this is the best defensive set of orders that a Danish-Norwegian player can place. At best, "The Danish Guinea Pig" can only buy a little time, as Denmark-Norway has little chance of defending itself against a concerted British-Swedish attack. As such, "The Danish Guinea Pig" can only be recommended under desperate circumstances, as it offers neither an effective defense, nor the rapid growth dictated by Danish-Norwegian strategic needs. This opening is called "The Danish Kamikaze" if it is a simultaneous full frontal attack on both Britain and Sweden. At a minimum, France and Russia would be required as committed allies for such an audacious assault, with Prussia and Spain likely needed as well. As a further advantage, "The Danish Kamikaze" does not leave Denmark-Norway as vulnerable as other offensive openings do, because it is the defensive-minded "Danish Guinea Pig" as well. The massive risk of "The Danish Kamikaze" is that the Danish player has intentionally started a two-front war in which they only have one unit on each front. "The Danish Kamikaze" sounds insane when put in those terms; but Danish-Norwegian players — and for that matter Diplomacy players in general — cannot be afraid of making unconventionally aggressive moves. There are other, less catchy Opening 3 scenarios, mainly if one move is offensive while the other is defensive. The most likely example here is if the move to Scania is a planned bounce with Sweden, while the move to the North Sea is part of an offensive coordinated with France. The planned bounce is a bad idea though, because neither Denmark-Norway nor Sweden has the luxury of using half their units in a non-productive manner. A Danish-Swedish alliance needs to make use of all their units on other fronts. 4F Christiania to North Sea (or Skagerrak, or hold), F Copenhagen to Baltic Sea
Opening 4 is only likely with a Swedish ally who permits the move of F Copenhagen to Baltic Sea as part of a joint Baltic operation. In this situation, the move would be successful, and F Baltic Sea would be available for action against Prussia, Courland, support in the Gulf of Bothnia, or a tricky stab of Sweden. In this case, moving F Christiania to North Sea is an aggressively defensive move. It assumes a hostile Britain & Hanover that needs to be slowed as much as possible in order to create breathing space for the Baltic operation. However, if conflict with Britain & Hanover is imminent, then opening 1 or 2 would be preferred, as these devote two units to the British front. Given Danish-Norwegian weakness vis-à-vis Britain & Hanover, a more subtle approach may be preferable. Holding in Christiania, or even (harmlessly) supporting a British fleet into the North Sea as a goodwill gesture, may be more effective in terms of maintaining friendly relations with the British. Another alternative is moving to Skagerrak, from which both Christiania and Copenhagen could be defended, but neither Britain & Hanover nor Sweden would be offended. This opening offers a balanced mix between offense and defense, with F Baltic Sea having a pretty good opportunity to pick up a third supply center in 1763. This is a good opening assuming the combination of a strong Swedish ally and an inability to attack Britain & Hanover (due to a lack of willing allies). The problem with Opening 4 is that Denmark-Norway will run into mid-game difficulties as Britain & Hanover and Sweden both grow also, and Denmark-Norway has at best gained one more unsustainable supply center. 5F Christiania to North Sea, F Copenhagen to Holstein (east coast) At first glance, this set of orders appears similar to Opening 1. However, given the impossibility of taking Hanover from the east coast of Holstein, it's actually more similar to Opening 4. This opening is more defensive than Opening 4, as it protects against a British move to Holstein, and does not risk offending Sweden. This comes at a heavy price, with offensive options likely limited to Mecklenburg in fall. Without a rock solid promise of support into Mecklenburg from either Sweden or Prussia, this opening is too cautious to consider seriously. Given that Mecklenburg would then become a third home supply center for Denmark-Norway, it is easy to understand why neither Sweden nor Prussia would be enthusiastic to see that type of Danish-Norwegian growth. Eastern OpeningsThe other group of openings is those that use F Christiania to Scania and show a more eastward orientation by the Danes. A move to Scania is essentially a declaration of war against Sweden. Denmark-Norway will face a significant problem in F�1763 whether the move succeeds or fails. If the order succeeds, then the British fleet in the North Sea will be tempted by the empty supply center of Christiania in F�1763. To divert the British fleet, the Dane should consider offering Danish diplomacy points to help secure a safe berth for F North Sea in Northern Germany. If the move fails, then Sweden moved F Stockholm to Scania, and probably also moved A Abo to Lapland or Novgorod. This means that there will almost certainly be two units (Swedish A Lapland/Novgorod and British F North Sea) bordering Christiania, which will be manned by an isolated Danish fleet. There is a very obvious deal to be struck in this situation, with the Swedish army supporting the British fleet into Christiania. Russian pressure on Swedish home supply centers can help to alleviate the danger, but the fact remains that Denmark-Norway would be in a compromised position. Therefore, one would expect that Denmark-Norway is typically the loser when the Scandinavians get scrappy in spring 1763. The statistics bear this out, as this scenario occurred in 4 of 12 games for which we have opening moves data, and Denmark-Norway was quickly eliminated in all 4 games. Consequently, Danish players need to exert their full diplomatic effort to push Sweden in a different direction, as a Swedish attack spells the death of Denmark-Norway in any circumstances. 6F Christiania to Scania, F Copenhagen to Holstein (west coast) Opening 6 makes sense under a couple scenarios. The first scenario is that this is a hyper-aggressive opening, with the goal of attacking both Stockholm and Hanover in F'1763. This is a great opening as part of a large coalition — including Prussia, Russia, plus hopefully France and Spain — that will enable Denmark-Norway to take on both Sweden and Britain & Hanover simultaneously. The movement of F Copenhagen to Holstein (wc) allows that fleet to move west against the British next, after the British army in Hanover has been destroyed. The other Opening 6 scenario is a cautious attack on Britain & Hanover. The move to Holstein (wc) obviously makes sense. The move to Scania could be set up as a planned bounce with Sweden, or simply a defensive move to ensure no Swedish stab. Implicitly, this tactic acknowledges that F Christiania will not be able to bounce the British in North Sea, and so it might as well be used in a productive manner. 7F Christiania to Scania, F Copenhagen to Helgoland Bight This set of orders is very similar to Opening 6. The move to Helgoland Bight risks that the British army in Hanover will either move or retreat to Holstein. The advantage is that F Helgoland Bight has more options in the fall than F Holstein (wc), as F Helgoland Bight borders the United Provinces, Hessen-Westphalia, and the North Sea. 8a & 8b8a - F Christiania to Scania, F Copenhagen supports F Christiania to Scania
Opening 8 uses both units to force Scania, which cannot be blocked by the lone Swedish fleet in Stockholm. For an attack on Sweden, Opening 8a is obviously better, as F Copenhagen could then move to Baltic Sea in the fall. However, neither option is preferred for an all-out attack on Sweden — it would be better to use Opening 10 (see below). Opening 8 only makes sense as a balance between offense and defense. A Danish-Norwegian player may be concerned with a British unit moving to either the North Sea or Holstein, and thus want to leave a unit in Christiania or Copenhagen for defensive purposes. With this logic, Opening 8b is the superior option, as it leaves F Christiania to defend against the inevitable British fleet in the North Sea in F'1763. Combined with the move of Russian F St Petersburg to the Gulf of Bothnia — which should succeed with five total Russian and Danish-Norwegian diplomacy points influencing F Courland — Opening 8b could easily yield Stockholm in F'1763. With a Russian ally, and no serious worries that British A Hanover will move or retreat to Holstein, Option 8b provides a good option for the reasonably cautious Danish-Norwegian player 9F Christiania to Scania (bounce), F Copenhagen to Scania (bounce)
It's no secret — if one�s units never leave their home supply centers, one is unlikely to be very successful in Diplomacy. Opening 9 has comparable defensive value (not much!) to "The Danish Guinea Pig" opening, but it assures the Swedish player of the complete absence of hostile intent due to the self bounce. This opening, however, lacks the possibility of even accidentally lucking into a good offensive position. "The Anemic Danish Guinea Pig" is never recommended. Remember the Danish and Norwegian goal: to expand quickly, or die trying. 10F Christiania to Scania, F Copenhagen to Baltic Sea
This is the best set of orders for an aggressive attack against Sweden. This opening is named after Waldemar the Conqueror (1202-1241) who established a Baltic-based empire for the Danes. The Waldemar Opening is even more effective when combined with Russian moves to the Gulf of Bothnia and Novgorod. With F Stockholm, Sweden can only block one move out of three potential moves to Scania, Baltic Sea, and Gulf of Bothnia. With luck, using diplomacy points to influence F Courland could even result in the success of all three moves. The downside of Opening 10 is that it leaves Denmark-Norway very vulnerable to a British attack. For this reason, Danish-Norwegian diplomats should work overtime to entangle the Bulldog in a war, preferably with France. If there are serious concerns about a British stab in Christiania in F'1763, then Opening 8b may be preferred. In the small sample of five games played under the current map and rules, this has proven to be the most popular opening, used four out of five times. Denmark-Norway gained a first-year build in only one of those four games, and that was in Courland. 11F Christiania to Scania (or hold), F Copenhagen to Holstein (east coast)
Opening 11 provides an interesting option if Denmark-Norway has a strong British ally. Prussian hostility towards Hanover can be turned to Danish advantage, as the Danes are the most natural ally for A Hanover. There is a mutually beneficial deal to be struck, with Danish diplomacy points supporting the defense of Hanover in S�1763, and then A Hanover supporting Danish F Holstein (ec) into Mecklenburg in F�1763. Further conquest into Berlin is also possible. The move of F Christiania to Scania can be either offensive or defensive. With a Russian ally, it has the potential to capture Stockholm, and raises the incredible possibility of Denmark-Norway gaining two supply centers in 1763. With a build in W'1763, Denmark-Norway gains a major advantage in a war with Sweden. Defensively, the move to Scania protects against a Swedish stab. To avoid antagonizing Sweden, it may be smarter to hold in Christiania, which has the added benefit of not leaving Christiania empty in F'1763. Additional Note on HanoverGiven the threat posed by Britain & Hanover, the natural instinct for the Danish-Norwegian player is to encourage Prussia to attack Hanover immediately. However, as can be seen from many of the above openings, it can be very problematic if the British army in Hanover is dislodged in S'1763. Therefore, a Danish player should try to convince Prussia to wait until F'1763 to attack Hanover, although Prussia has little incentive to wait. It may even be preferable to secretly use DPs to support the defense of Hanover in S'1763, or feed intelligence of a Prussian attack to the British player. There is no right answer, and Danish players must weigh the benefit of reducing the British supply center count versus dealing with the fallout of A Hanover retreating to Holstein. Into the Middle GameLooking at the middle game, if the Danish player attacked either Britain or Sweden and was successful, then there should be a solid base to work from.� With the first, western oriented scenario, Denmark-Norway may have to deal with a strong Sweden on the eastern frontier, or ideally could focus on the west instead. A second western offensive would likely be directed against a growing threat from France. One nice thing about this option is that a larger France should start facing major pressure from some combination of Austria, Spain, or Prussia at this point, and so there should be some eager helpers against France. If France has reached as many as eight supply centers, noises painting Paris with "early leader syndrome" should be loud and constant. If Sweden was eliminated, then getting squeezed between Britain & Hanover and Russia (both of whom are almost certainly strong) is the main problem in the middle game.�The Danish-Norwegian player should seek to split them, and target one while getting the other involved in other areas.� Russia may be the better target, because they represent more of a consistent threat throughout the rest of the game, as Russian fleets in Scandinavia and the Baltic now have little to do but attack Denmark-Norway. Denmark-Norway should be able to get help from powers like Austria, Poland & Saxony, Prussia, or Turkey.� When attacking Russia, keep in the mind the option of building A Christiania, which is only two tempi from Moscow. Choosing a plan besides attacking Britain & Hanover or Russia — such as attacking into North Germany and Prussia — is a risky third option, because the threat of being squeezed between Britain & Hanover and Russia remains. If the Danish-Norwegian player opted for "The Third Way" (neither attacking Britain & Hanover nor attacking Sweden), then both neighboring powers are likely alive and well, and Denmark-Norway risks being crushed between them next.� The middle game situation is similar to the game start scenario, except everyone else on the board has gotten stronger, while Denmark-Norway has (at best) picked up an indefensible third supply center from among the minors along the Baltic or Helgoland Bight coastlines. This illustrates the main dilemma of Denmark-Norway in the Ambition & Empire variant.� Denmark-Norway is both small AND has an exposed defensive position.� Britain & Hanover and Russia both start with great defensive positions, and if Sweden takes St Petersburg, then they have a pseudo-corner position as well.� Even success in the early game will leave Denmark-Norway as (at best) a medium-sized power in the middle game — Denmark-Norway will be at 3-5 supply centers without a corner position, while there will surely be at least one power with 7+ supply centers by then. The best way to mitigate this is to work diplomatically towards Britain & Hanover, Sweden, and Russia all being as weak as possible entering the mid-game.� This means that France, Spain, Austria, Turkey, Poland & Saxony, and Prussia (maybe… as long as they don't build fleets) are all valuable allies and counterweights, and the Dane want to see them succeed at the expense of his middle game rivals.� This situation also dictates an aggressive, risky strategy, because you need to expand faster than everyone else to stay alive. To bring back that poetic refrain: expand quickly, or die trying. The authors would like to thank Jeff Kase, Karsten Nitsch, Baron Powell, and Charles Roburn for their suggestions and contributions. About the Authors
If you wish to e-mail feedback on this article to the author, and clicking on the envelope above does not work for you, feel free to use the "Dear DP..." mail interface. | |||||||||||||||||||||||||||